|
Filter Quilter
©1998 Alison King
Rationale: When young students first begin to learn how to paint with traditional brushes and paintpots, they need ample time to experiment with color mixing, textures, lines and forms before they can be expected to create representational (realistic) paintings. This digital painting lesson is constructed in the same spirit to help students explore the qualities that make digital painting quite different from traditional painting, and will give the student a repetoire of skills to draw upon for future representational paintings. It should be introduced with a spirit of play, risk-taking and experimentation early in the teacher's sequence of digital art lessons.
Technology Objective: Students will learn that the Adobe Photoshop is a flexible, forgiving design tool that helps visualize multiple solutions within the same painting.
Artisitc Objective: Students will learn that digital paint may be manipulated with filters and paint-modification tools in a non-representational painting that demonstrates the differences between pattern and texture.
Motivational Question:
- Why is a quilt often called a "patchwork" quilt?
(multiple pieces combined in a pattern to make a total, overall design)
Dialogue:
- What design qualities do patterns have?
(repetition, color, line, etc.)
- How is texture different from pattern?
(has a "feel" to it, light and shadow, etc.)
Demonstration Dialogue:
- What makes the paintbrushes in Photoshop different from other painting programs like HyperStudio or ClarisWorks?
- What tools appear to be the same in HyperStudio and Photoshop?
- How do they behave differently?
- What is the difference between opaque color and transparency? How can we control it?
- Which tools transform and manipulate color rather than add more paint?
Demonstration Advice:
- Elicit student input during the demonstration part of each lesson.
- Ask them which color they would like to see added to the design, where shapes and brushstorkes should go.
- Ask them what they think might happen when a certain effect is applied i.e. large vs. small Smudge Tool.
- A student artist may "man the mouse" if desired.
Technical Sequence To Demonstrate:
- Use the Paint Bucket to fill the entire canvas with a single color.
- Demonstrate the different qualities of paintbrushes and airbrushes, then how to modify them with the Tool Options palette. Lay brushstrokes down in a striking, complex pattern.
- Demonstrate the Smudge, Waterdrop, Dodge and Burn manipulation tools.
- Introduce the vocabulary term "manipulate".
- Demonstrate how to manipulate the pattern using these tools.
- Creative Visualization and Transition Back to Workstations:
- What kinds of repetitive patterns could you make using the paint brushes and paint manipulation tools?
- Which color would you like your canvas to be before you begin to paint?
Art Activity:
- Students will spend 10 minutes using paint tools, various Tool Options, and manipulation tools to cover their canvases with a repeated pattern using a minimum of four colors on a 400 X 400 pixel canvas.
- Students who indescriminately scribble or doodle will need a quick review of what constitutes genuine pattern.
Regroup and Focus: After 10 minutes of painting and manipulation, gather students around the presentation station for a second demonstration.
Demonstration Dialogue:
- How can we use our other manipulation tools to give our patterns the illusion of having a texture? Explain concept of filters and demonstrate one.
- If we want to apply a filter to another square area on our canvas, how can we ensure that the filter is applied only to that area? Demonstrate square marquee/selector tool.
- The Photoshop canvas is a very flat thing: which filters do you think will best give the illusion of textural paint "building up" or "smoothing out" on our canvas?
Technical Skills to Demonstrate:
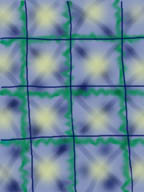
- Demonstrate how to divide the canvas into six equal parts for six different filters. Use students' suggestions for which filters to explore as the procedure is demonstrated in squares 1 - 6.
- Demonstrate how to apply a 7th and 8th filter over the middle of the canvas where different textures converge, thereby layering textures on top of four others for unexpected results.
- Demonstrate how to use the "undo" feature to get rid of unwanted effects, or explore alternate aesthetic solutions. Deliberately "make mistakes" to demonstrate the feature's effectiveness.
Creative Visualization and Transition Back to Workstations:
- Which filters would best enhance the texture of your patterned Filter Quilt?
- Will your Filter Quilt have a rough surface? A smooth one?
- Will your Filter Quilt have an eclectic collection of textures or will it include textures with a similar "feel"?
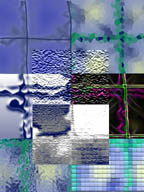
Art Activity:
- Students will spend 15 minutes exploring the textural effects available through the use of filters.
- Early finishers may make a second Filter Quilt of their own design.
Sharing Techniques:
- Students should share the results of their filtered textures with their neighbors.
- Students who have chosen unique and aesthetically striking combinations of filters may be spotlighted throughout the activity.
Follow-Up Project:
- Students will create a painting of ________ (subject to be determined by your own curriculum), and will use three to five filters to create the illusion of texture in a digital painting.
|